Symal-Fuse™
Dual Containment Systems
There are multiple methods by which to butt fuse dual containment systems, and it’s true, some are better than others.
Our years of experience have helped us identify which work best. As a valuable added service to our customers, we can work with your design team to ensure proper best practices are implemented and that your investment is well protected or we can design your project from scratch. ASME B31.3 certified welds and testing is also available should your project require it.
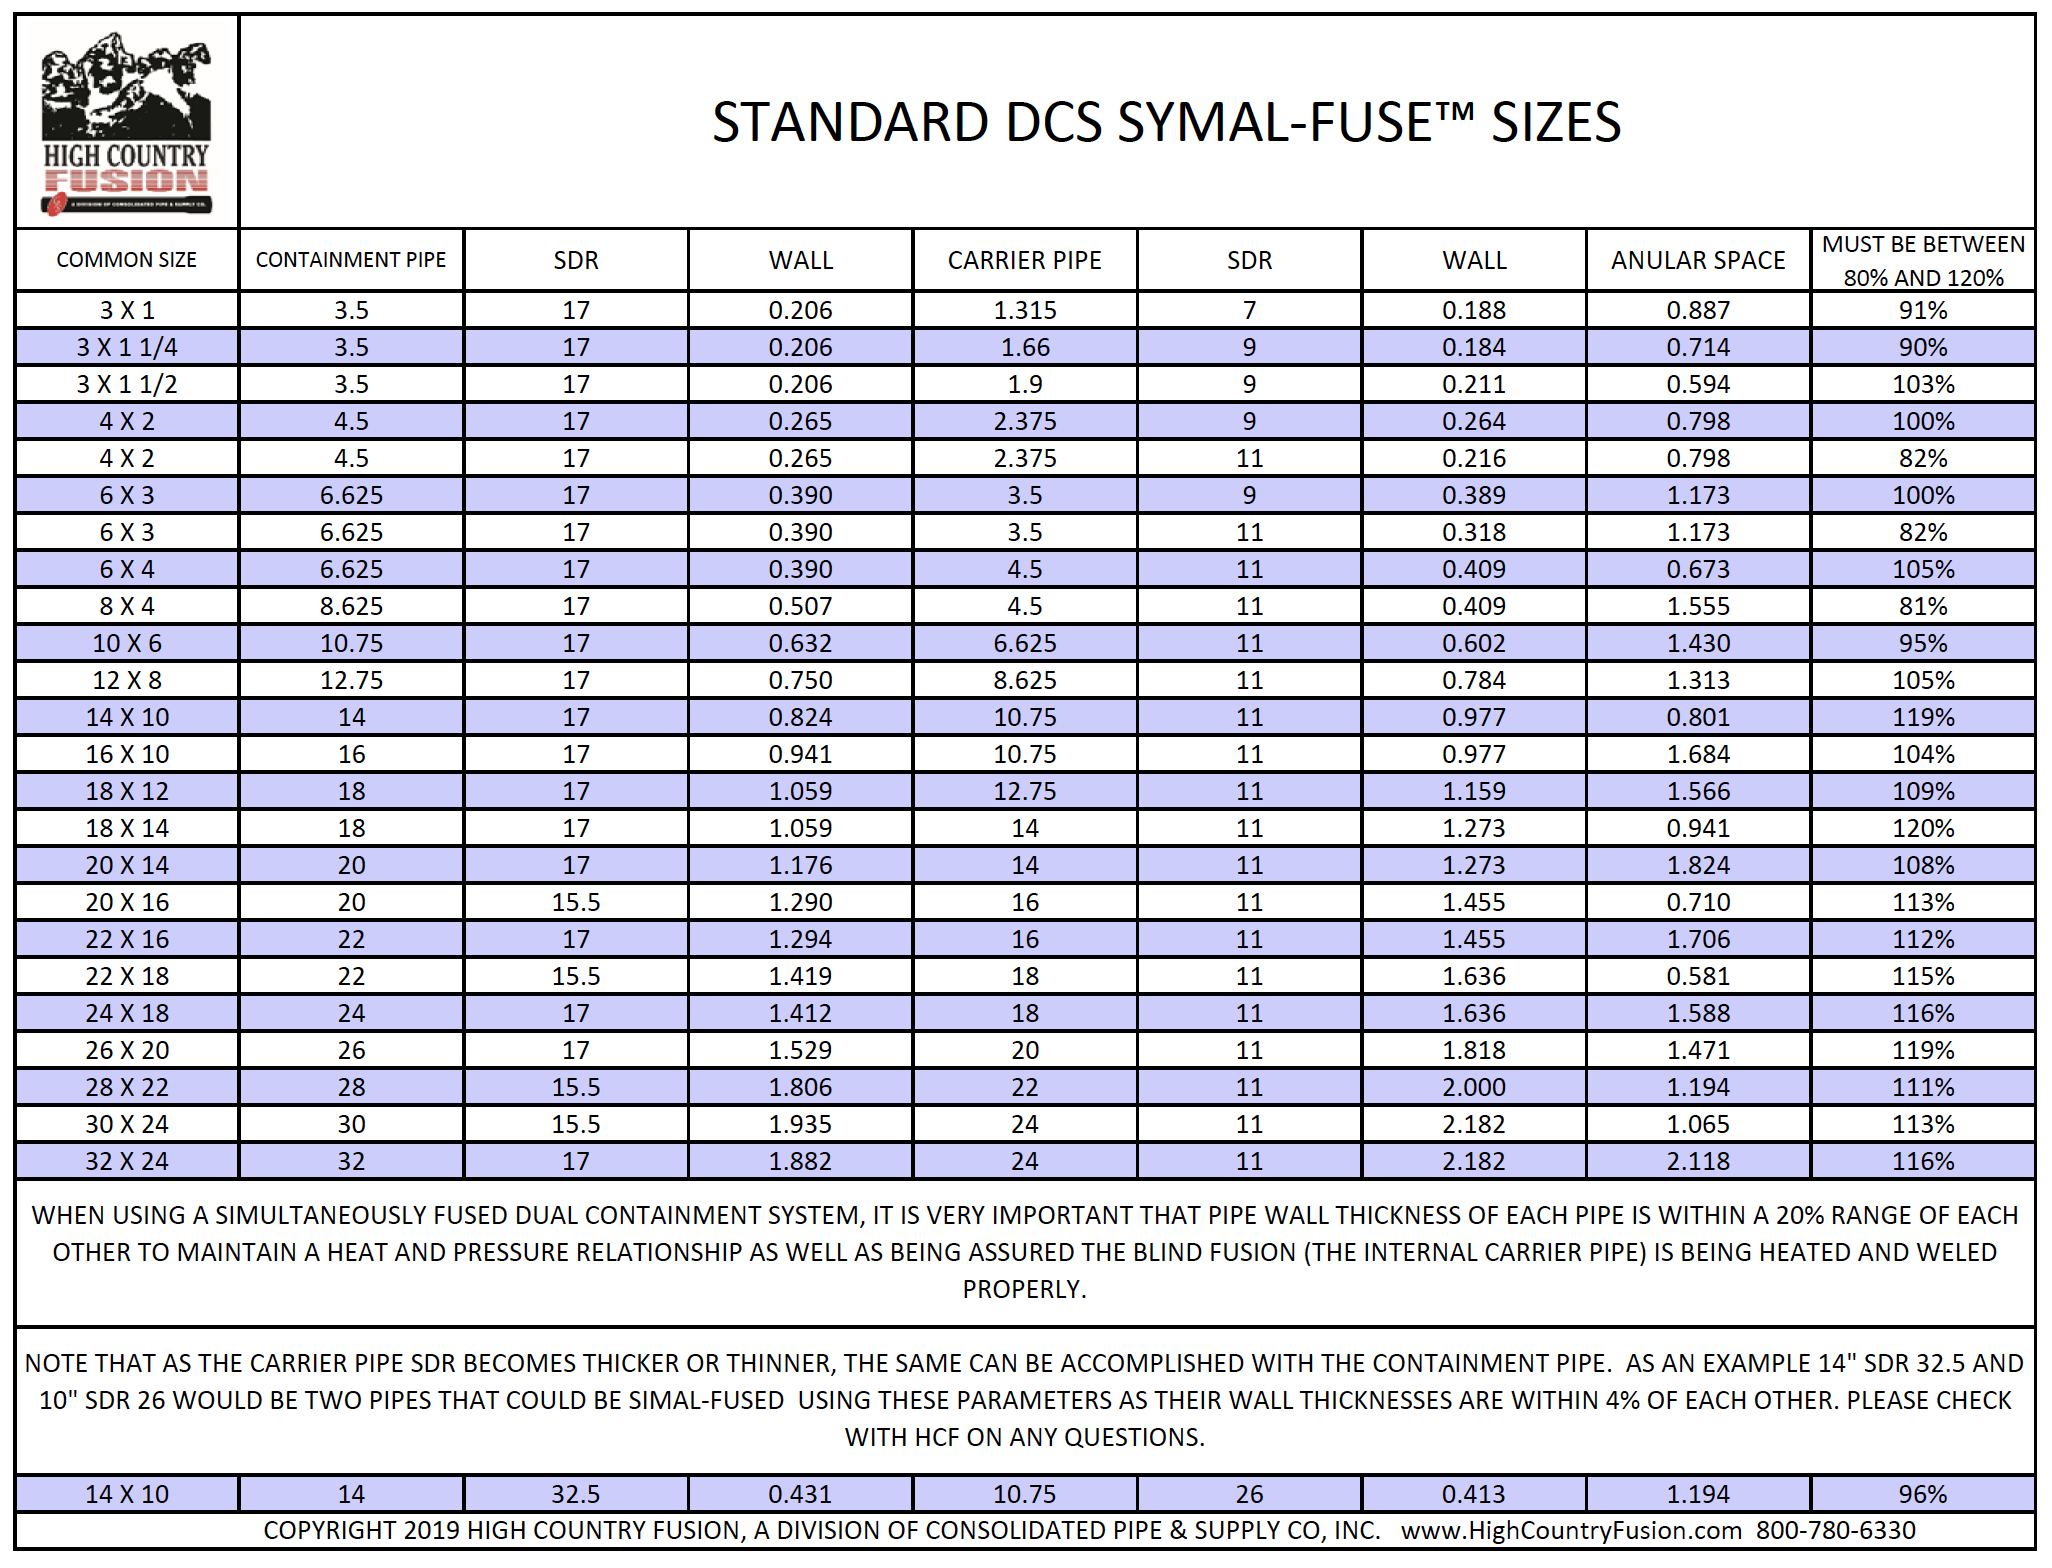
System Sizes
DCS System Design
DOUBLE CONTAINMENT HDPE SYSTEMS CONSIDERATIONS
Simultaneous Fused Systems
Simultaneous fused DCS (Double Containment System) piping systems, like HCF’s Symal-Fuse™ system, are the easiest to install vs. split-heater type DCS systems. Depending on the complexity of the system, it can affect your installation success from one type to the other.
Double Symal-Fuse™ Ends – Double Symal-Fuse™ ended pipe lengths create the most reliable system for in the field installation. Since both pipes are locked in place by factory welds, this system lends itself to simpler installation. These are the most expensive systems available and work in predetermined lengths only.
Single Symal-Fuse™ Ends – Single Symal-Fuse™ ended pipe lengths are the next most reliable system for in the field installation as well as much more economical and most often used. With one end of the pipe length locked in place by a factory weld you have a system that can be cut to length and fit where needed. There is more technical knowledge and experience needed with this type of system.
Open Ended Ends – Open ended pipe lengths that have a press fit end spacer only on both ends have the potential to slip during the fusion process unless installed by a factory qualified technician with the proper equipment. (Note most fittings are manufactured this way, and work properly in a fitting configuration).
Open Ended Ends w/ Extrusion Welded End Spacers – This type of system, if done properly with adequate extrusion welds in place, can create an effective system. The potential problem comes from possible extrusion weld bonding breakage between the end spacer and the two pipe walls during transportation and installation. Dropping the pipe or flexing it too much during transport can cause the extrusion weld (which is a surface non-penetrating weld) to crack or break. This separation could cause the inner pipe to slip during the simultaneous fusion process and of course you would never see it.
Split Heater- Separately Fused Systems
Double Containment piping systems can be assembled using two separate pipe sizes and by using a specially designed split heater in combination with the standard butt fusion heater. These are the potential methods.
Method “A”
- Fuse several lengths of pipe together in each size, several times.
- Remove internal bead on the containment (outer) pipe. (So not to catch on the casing spacers when pulled together).
- Install casing spacers on the carrier (inner) pipe.
- Fish a line through the containment pipe to pull the carrier pipe through.
- Pull the carrier pipe into the containment pipe. And establish a partially assembled section, or “unit”.
- Put the two pipe units into the fusion machine with inserts to hold the carrier pipe and keep the containment pipe out of the machine. Fuse the carrier pipe.
- Once the fusion has cooled, change the inserts in the machine to the containment pipe size and using a split heater, fuse the containment pipe.
- After cooling remove the combined unit from the machine and repeat.
- Note, moving the outer pipe back and forth becomes more difficult as the combined sections get larger.
Method “B”
- Install spacers on carrier pipe sections.
- Slide a carrier pipe into each containment pipe section.
- Put two sections of pipe into the machine and fuse the carrier pipe as in method “A”.
- Once the fusion has cooled, change the inserts in the machine to the containment pipe size and using a split heater, fuse the containment pipe.
- After cooling remove the combined unit from the machine and repeat.
- Note, this method does not require removing the internal bead and it is easier to move the added piece back and forth vs. longer sections.
Method “C”
- Fuse the carrier pipe and strip the outer bead.
- Fuse the containment pipe and strip the inner bead.
- Fish a rope through the containment pipe.
- Pull one pipe inside the other.
Note, in this method, no centering or casing spacers are used.
Symal-Fuse Procedure 2022
HIGH COUNTRY FUSION, a DIVISION OF CONSOLIDATED PIPE & SUPPLY CO. INC.
SYMAL-FUSE™ DUAL CONTAINMENT HDPE PIPING SYSTEM
GENERAL WELDING PROCEDURES 4710 MATERIALS
I. INTRODUCTION
High Country Fusion’s Symal-Fuse™ System is a dual containment piping system. HDPE is a thermoplastic material that is joined through thermoplastic heat butt fusion welding. A weld results when HDPE is “squeezed” together with heat and pressure. The weld zone must be clean and dry, and the material must be properly aligned. The standards for butt fusion welding is ASTM F2620-19 and PPI TR-33, and are referenced below.
“High-points” of the Simultaneous Butt Fusion-Welding procedure:
- Symal-Fuse™ simultaneously welded systems install very much like single wall piping. This provides a system that contractors can install without a steep learning curve.
- Symal-Fuse™ pipe and fittings are designed for simultaneous butt fusion welding where both pipes are welded at the same time.
- The Symal-Fuse™ Simultaneous Butt Fusion Procedure follows the visual practice for single wall butt fusion welding as identified in ASTM F2620-19 Guidelines for Polyolefin Thermoplastic Butt Fusion Heat Welding and PPI TR-33. By making sure that both containment pipe and carrier pipe have wall thicknesses that are within 20% of each other, getting a good double fusion can be obtained easily using standard fusion practices.
II. Symal-Fuse™ WELDING PROCEDURE
- Check the fusion parameters for your pipe and fittings. Fusion temperature for standard HDPE material is 425°F. The butt fusion interfacial pressure at the pipe ends for standard HDPE material is 75 psi +/- 25 psi. Actual fusion equipment gauge pressure will vary depending on the equipment manufacturer, the pipe SDRs and the pipe diameters. Refer to the specific operating instructions for the equipment that is being used for the specific operating procedures. For example, a McElroy hydraulic fusion machine (a #28 machine and larger) with the hydraulic manifold must have the fusion pressure set, the heat soak pressure set, and the facing pressure set. The understanding and use of the manifold shifting sequence is essential to a good weld. Whereas a Christie fusion machine with a hand pump hydraulic system uses a single gauge that is checked for the different pressures during the welding cycle. If using McElroy fusion equipment, go to http://www.mcelroy.com/en/university/videos.htm and review both the Theory of Fusion and the Determining Drag Pressure so you make sure you understand the Butt Fusion process.
- Symal-Fuse™ pipe and fittings are designed for simultaneous butt fusion welding. Both carrier and containment pipes are joined at the same time.
- Symal-Fuse™ Ends are welded to the carrier and containment pipes on one end to prevent any movement between the two pipes. In this manner pressure can be applied evenly to both pipe ends. Centralizers are the pipe support and guidance system for the carrier pipe. An end spacer is used on the non-Symal-Fuse™ end to center the pipe so that the fusion surfaces between the Symal-Fuse™ end and the non-Symal-Fuse™ end are correct.
- Check the fit of the heater in the fusion machine and check the heater surface condition. Plug in the heater and the fusion machine itself. Check the equipment for proper operation and sufficient power. Make sure that the heater is hot enough per the specific fusion parameters for your pipe and fittings before beginning the welding process. Wipe off the heater face with a clean, dry cotton cloth (synthetics will melt) before each weld with no exceptions.
- The next step is called “facing the pipe”. The facer is a rotary planer that “shaves” the pipe ends to provide clean, parallel pipe ends. Proper facing is critical in any butt- fusion procedure. Before facing, wipe the pipe ends with a clean, dry cotton cloth. Once facing is complete, all four pipe ends will be smooth, clean, and parallel. Remove the pipe shavings and using approved HCF Isopropyl wipes (preferred) or a fresh, clean, dry cotton cloth, wipe the pipe ends again. Make sure no contamination such as oil, dust, dirt, water, etc. are on the pipe ends.
- After facing the pipe ends, remove facer and check alignment of the containment pipe by bringing the pipe ends together.
- The pipe ends are then separated so the heater can be placed in the fusion unit. Wipe off the heater face with a clean, dry cotton cloth (synthetics will melt) before each weld with no exceptions. The heater is placed in the fusion unit. The pipe ends are then brought in direct contact with the heater plate. Check to make sure that the containment pipe ends are in full contact with the heater on both sides, Fusion Pressure is applied at this time and fusion pressure must be maintained until a slight melt is observed around the circumference of the pipe before releasing pressure to generate the start of the heat soak cycle. PRESSURE MUST BE RELEASED TO ZERO FOR THE HEAT SOAK CYCLE. If using McElroy Equipment please refer to http://www.mcelroy.com/en/university/videos.htm and review the “shifting procedure” animation to make sure you understand the procedure. The pipe material absorbs heat before fusion pressure is applied. A bead of material will form as the pipe heats up and “flares” outward from the expansion of the pipe end. The weld bead formation is observed and indicates the pipe is hot enough. The weld bead should be uniform around the pipe OD. Correct weld bead formation and size indicates sufficient heat soak. ASTM F2620-19 has BOTH heat and cooling cycle time parameters that should be followed based on the OD and wall thicknesses. The welding pressure for the Symal-Fuse™ DCS pipe is a combined fusion pressure for both the internal pipe and the external pipe, based on pipe size, SDR and the type of equipment that is being used. Please consult with your supplier for the recommended fusion pressure.
- When the weld bead is formed evenly around the pipe ends and has been in contact for the prescribed time per ASTM F2620, then the heater is removed
- A Q.C. check is done when the heater is removed. The pipe ends are inspected. The weld bead will have formed on the ID as well as the observed bead on the OD of the containment pipe and on both the OD and ID of the carrier pipe. The pipe end itself should be flat or slightly convex with the bead flaring away from the pipe ends. A concave profile on the end of the heated pipe is not acceptable. The maximum amount of open time with the heater removal is covered in ASTM F2620-19.
- The pipe ends are brought together at this time. Follow the equipment operation instructions for applying fusion pressure. As fusion pressure is applied the weld bead roll-back is observed. When the bead has properly rolled-back, lock the machine so pressure is constant on the joint until it has cooled per ASTM F2620-19 cooling times for external pipe
- At this point the fusion weld is nearly complete. The pipe weld has only to cool down. The pipe can be removed from the fusion equipment when your thumb nail can no longer leave an indentation in the weld beads. These parameters are true for all cell classification minimum values of 445474C per ASTM D 3350, PE 4710 HDPE material.


